The Target Management feature is another addition to the RevOps suite in Corefactors. It enables managers and agents to keep track of their daily, weekly, or monthly targets.
By monitoring target progress, teams remain aligned. This feature allows businesses to adjust strategies, allocate resources, and take preventive measures.
Who can Access the Target Management Feature on Corefactors?
The Target Management functionalities can be accessed through a dedicated platform or portal provided by your organization.
Consult your IT department or supervisor for specific access instructions.
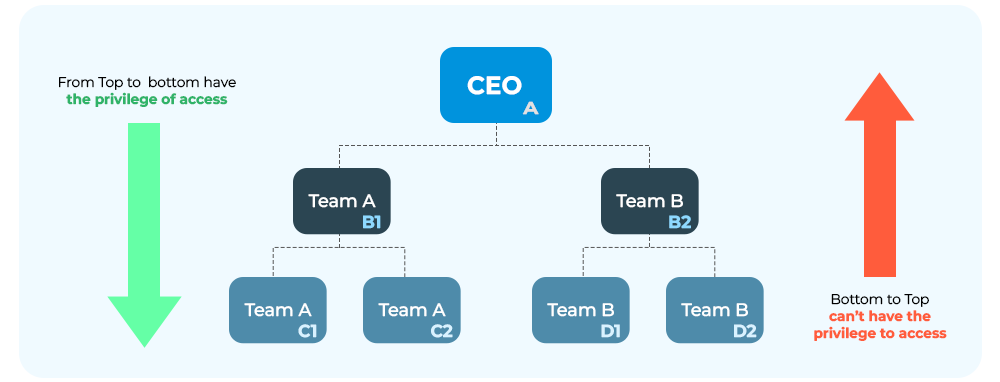
Different user roles may have varying access levels within Target management. Understand your designated role and its associated permissions to avoid encountering access restrictions.
Target Dashboard (Privilege Name- TARGET DASHBOARD)
The Target Dashboard is accessible only to users with the appropriate privileges. It provides an overview of key performance indicators and targets relevant to their role.
Target Configuration (Privilege Name- TARGET CONFIG)
Access to the Target Configuration is restricted to authorized associates or individuals. They can customize targets for their respective teams within this feature.
Target Configuration Administration (Privilege Name- TARGET CONFIG ADMIN)
Users with Target Configuration Admin privileges can customize sales targets and activity goals for individuals, including managers, team leaders (TLs), and their teams.
How Does this Feature Enhance Performance and Collaboration?
Boost Collaboration efforts by
- Ensuring everyone is aligned with the overall target objectives.
- Sharing your targets and progress updates with relevant stakeholders within your team or organization.
The Target Dashboard helps business owners (BO) trace the sales team’s target performance.
For example, if a team has sold 200 units of their product in the previous quarter, a manager may set a sales target of selling 250 units for the next quarter.
It helps individual agents achieve their targets. The target set will also determine the number of daily calls tele-callers need to make to complete their targets.
In this way, the Target Management feature helps optimize profit generation by setting and monitoring the right targets.
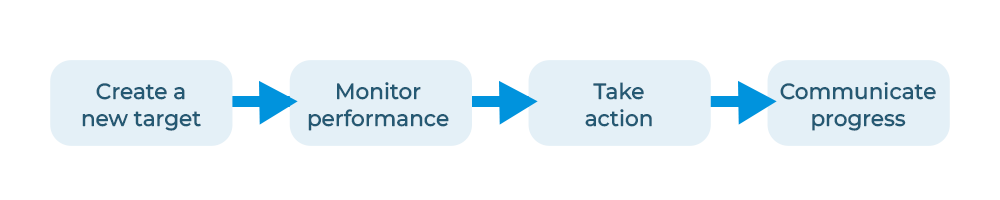
How Does the Target Management Workflow Look?
Create a new target: Define your goal, assign metrics, and set relevant details.
Monitor performance: Regularly review progress reports and identify any deviations from your target track.
Take action: Based on your monitoring, adjust strategies, allocate resources, or initiate corrective actions if needed.
Communicate progress: Share updates with relevant stakeholders to keep everyone informed and ensure alignment.
Where to Find the Target Management Feature on Corefactors?
- Go to Reports
- Click on Target Dashboard
You can view the existing target information on this dashboard. You will find all the Created Targets with their status like Target Name, Target Assigned To, Target Assigned to whom, Target Type, Target period, Target frequency, Target Status, created date, Modified Date, created by, Action.
Under Target Status, you may see Active, Draft, and Expired status.
How to use the Target Management Feature?
- Click on the Configuration button present in the top right corner of the Target Dashboard.
- Now click on Create Target, present on the top-right corner of the Target Info box.
- The Create Configuration page opens, where you'll need to input essential information.
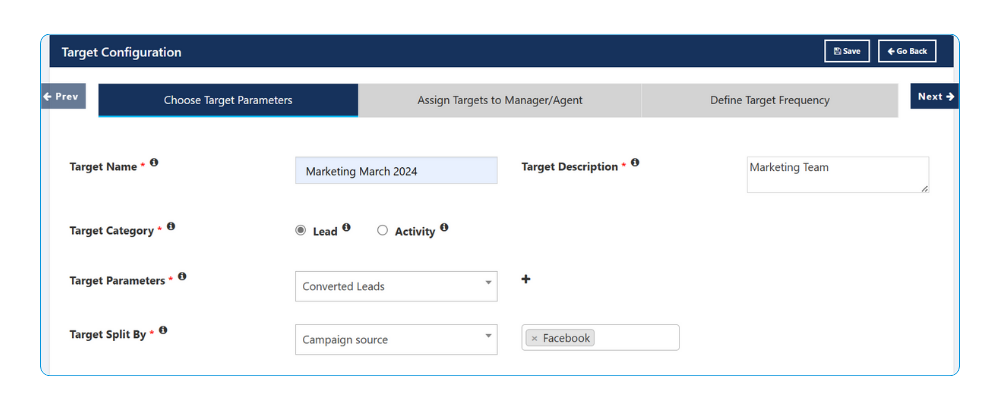
4. Fill in the Target Parameters
- Target Name: Provide a descriptive name for your target, such as Sales Target, Task Target, Campaign Target, etc.
- Target Description: This field requires a brief description of the target, for example, "This Target is for our January Month”.
- Target Category: Choose the target category, selecting either Lead or Activity.
- Target Parameter: Select specific parameters for the target, such as handled leads, hot leads, converted leads, revenue, and more.
- Target Split By: Determine how you want to split the targets, whether by Lead source, Teams, or other criteria.
If you choose Leads under Target Category, a drop-down appears.
A lead refers to a potential customer or prospect who has shown interest in a product or service offered by a company such as Handled leads, Hot leads, converted leads, or revenue.
- Handled Leads: Handled leads are leads that a sales associate has actively engaged with through a call or any other activity, excluding those classified as Deleted leads or leads expressing disinterest.
- Hot Leads: Hot leads are leads that have demonstrated a significant interest in purchasing the company’s services.
- Converted Leads: Converted leads are leads that have progressed through the sales pipeline and successfully closed deals.
- Revenue: Revenue in sales refers to the total amount of money generated from the sale of goods or services within a specific period.
- Lead Source: Lead source refers to the specific channels or methods through which leads are generated or acquired such as social media, email campaigns, website forms, referrals, events, advertising, and other promotional activities.
Instead of Leads, you can also manage your targets by Activity.
In target configuration, activities represent tasks assigned by upper management, such as managers, team leaders, and other executives. These tasks may include responsibilities like sending emails, making phone calls, and other related actions.

- Calls: In this task, you might need to make a call to the customer for a product or service.
- SMS (Messages): You need to run an SMS campaign to the customer for a product or service.
- WhatsApp (Messages): In this Activity, you need to run a WhatsApp campaign to the customer for a product or service.
- Meeting (Online): In this Activity, you have to take an online meeting regarding the company services or products.
- E-mails: In this activity, you need to run an E-mail campaign to the customer for the product and services or offers.
5. The next step is to Assign Targets to Manager/Agent where you will have to assign the Target based on their specific role.
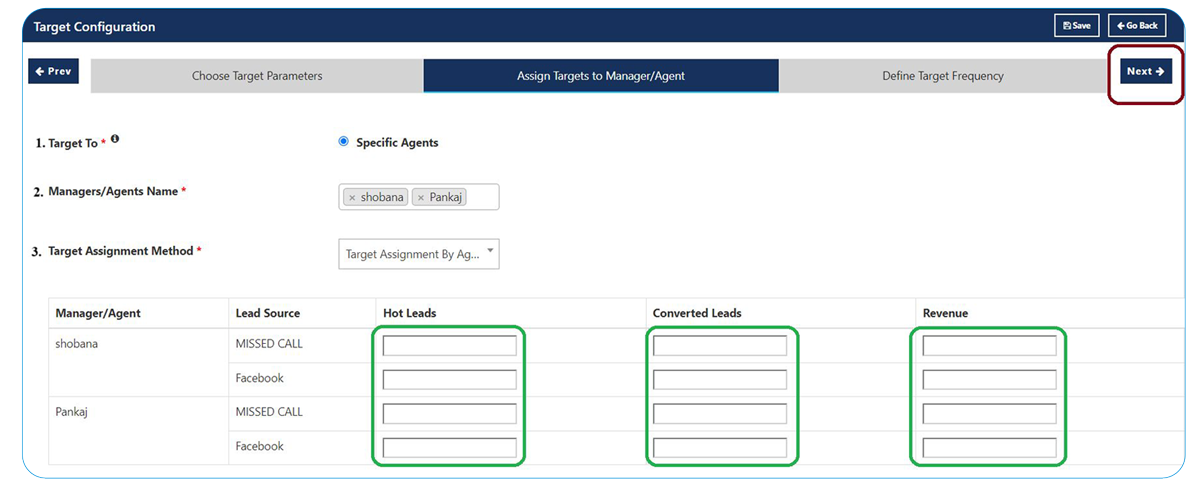
- Target To: This feature allows you to assign a target to a particular individual, whether they're a Manager or Agent.
- Manager/Agent Name: Depending on your selection in the "Target To" function, this field displays either the Manager or Agent names. For example, if you choose "Agent" in the "Target To" option, only the names of available agents will be displayed.
- Target Assignment Method: Here, you can specify how the target will be assigned. Choose between "Assigned by Agent or Manager," "Equal Distribution," or "Import."
Note: If you opt for "Import," you'll need to upload a .CSV file or Excel file containing the necessary data.
Fill in the fields according to your requirements.
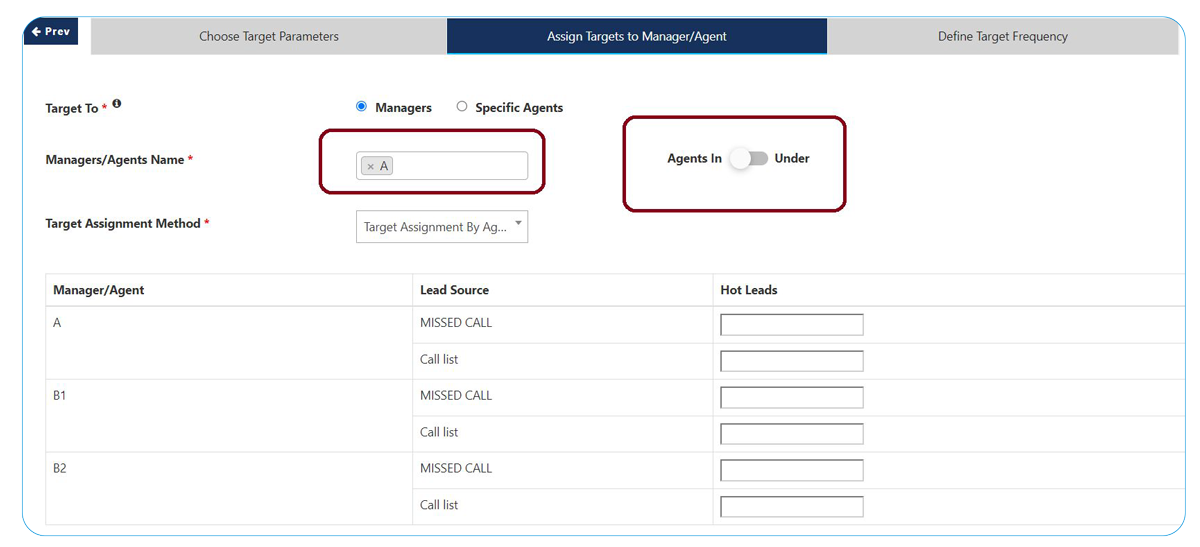
For Target To Manager:
I. When Agents In Under is Disabled then this feature enables the assignment of targets from upper management, such as “A” is Manager of B1 & B2 and B1 & B2 are Team Leaders for their associates. Users can only assign targets on the Hierarchy level.
Target Assignment Method: When you click on the dropdown, you will find these options.
Equal Distribution: With this method BO users and privileged users only can distribute the Target to their Team.
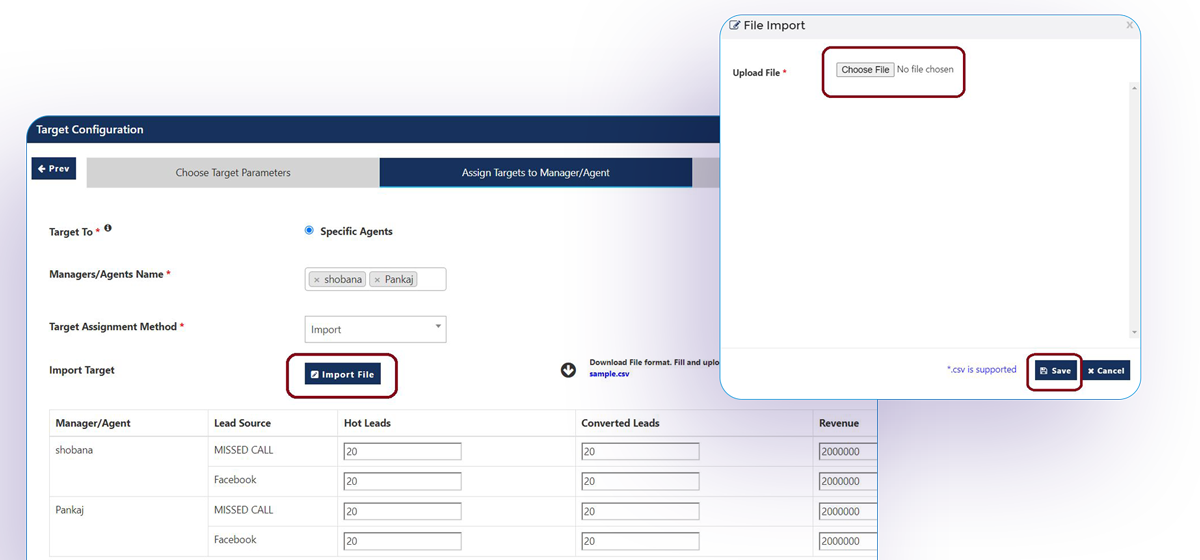
Import: This functionality allows you to import Data from your .csv file or Excel sheet, you’ll need to click on the Import file where you’ll need to Upload the .csv file or Excel sheet by Clicking on Choose file and Finally click on the Save button. Then click on Next.
II. When Agents In Under is Enabled this feature allows users to Assign Target to anyone in their team.
As it can be seen, the manager’s Name is “A” under “A” Whoever is working can be seen in this List.
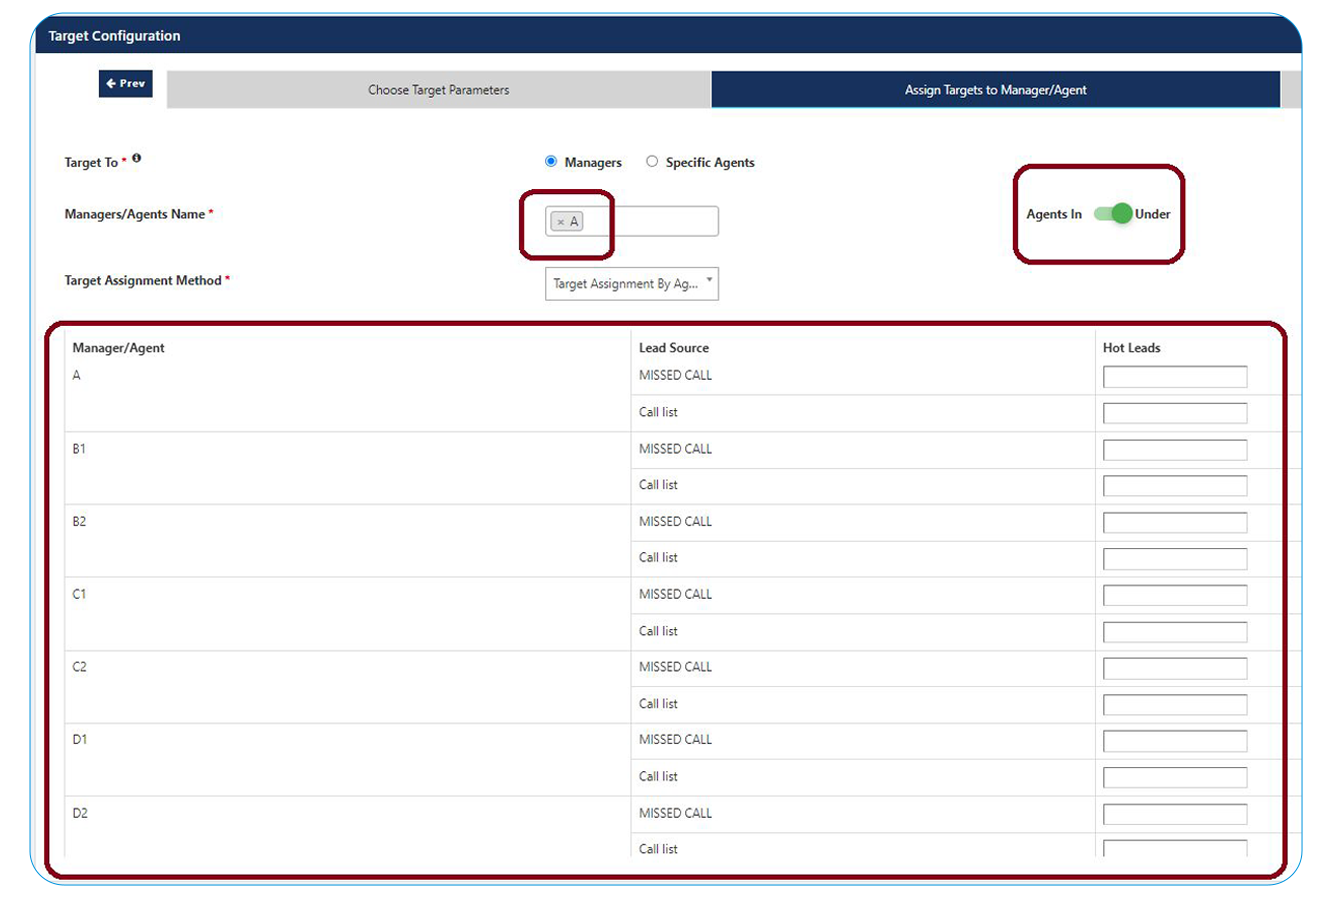
There are three different Methods for Target Assignment
- Target Assignment By Agent: In this particular method, Business owner(BO) users and privileged users only can assign the target to their Team.
- Equal Distribution: With this method, Business owner (BO) users and privileged users only can distribute the Target to their Team.
- Import: To initiate the file import process, begin by downloading the sample format Excel sheet. Once downloaded, proceed to input the required data into this Excel sheet then simply save it.
Note: To import the file, you must upload the identical Excel file that you previously downloaded. saved as a sample Target Distribution sheet.
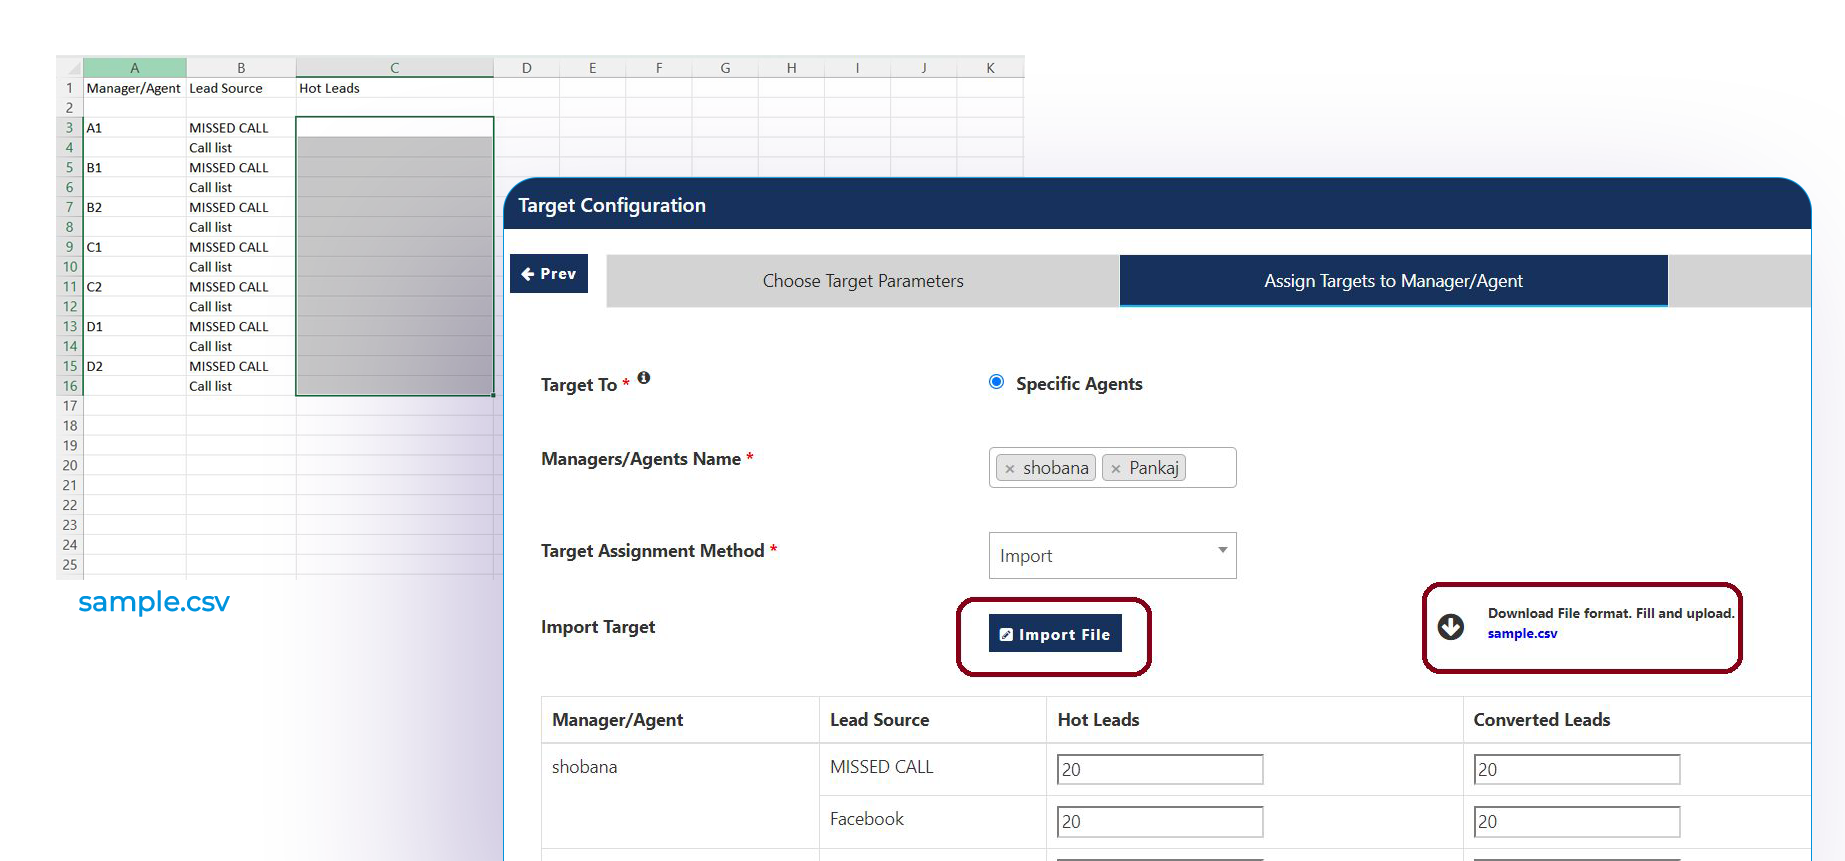
The Import functionality allows you to import data from your .csv file or Excel sheet, you’ll need to click on the Import file then you’ll able to see the 2nd screen where you’ll need to Upload the .csv file or Excel sheet by Clicking on Choose file and finally click on Save button. Then click on Next.
6. The next step is to Define Target Frequency.
This page offers the functionality to specify the frequency of targets and the period for which this target is set.
- Target Frequency: This feature enables the setting of targets for your team on a daily, weekly, monthly, etc., basis. It signifies that your team is expected to meet these targets within the designated timeframe.
- Target Period: For example, if you choose the target frequency as Monthly, you must select the target period every month exclusively.
Suppose, my target is 10 converted leads daily for the present month, here Target Frequency is Daily, and Target Period is This Month.
7. After selecting everything just simply click on Finish.
What other Actions Can You Perform from the Target Dashboard?
- Each target created comes with a set of action buttons.
- View Target: This feature enables you to view the target.
- Duplicate: This feature enables you to create a duplicate or copy of the same target.
- Deactivate Now: This feature enables you to deactivate a specific target.
Note: To Edit the target, you need to click on "Deactivate Now" first; only then will you be able to edit the target.

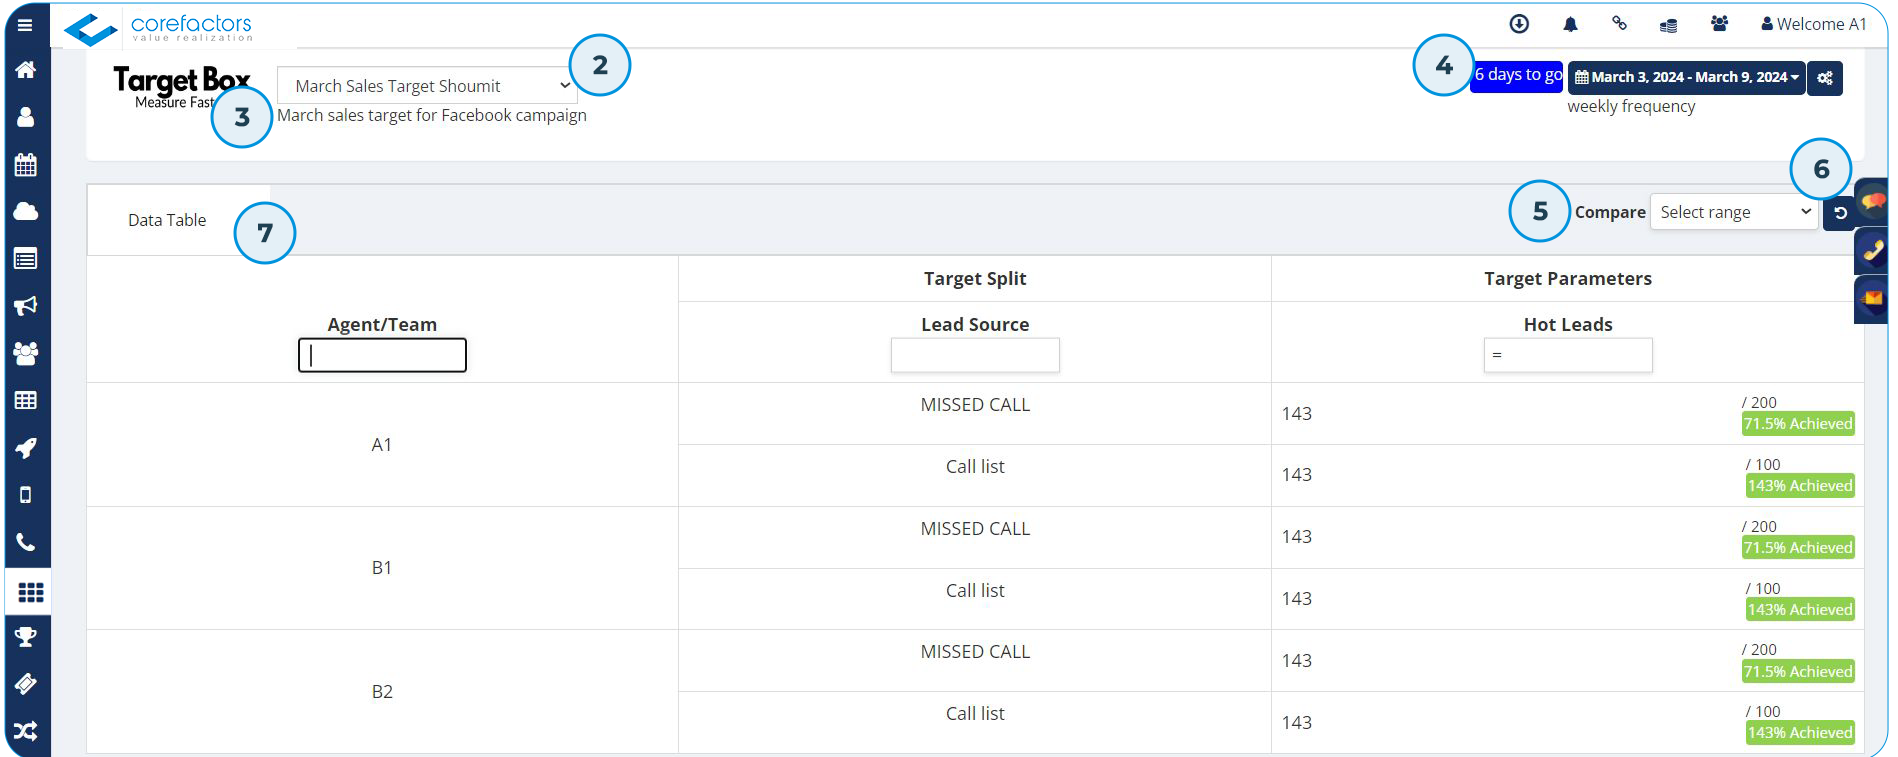
2. Target Filter Dropdown: It is a dropdown to filter Configured Target. You simply need to click on the dropdown, there will be a list of Configured Targets, and select the target.
3. Target Description: This feature provides a detailed description of the target and it comes from the Target description. While configuring the Target to the team it allows users to view specific information such as "This is our March sales target for the Facebook campaign."
4. Expiry Reminder: This feature displays the number of days remaining until a target expires. For instance, if you've set a target frequency for a week, it will show the countdown in terms of days until expiration on a day-by-day basis.
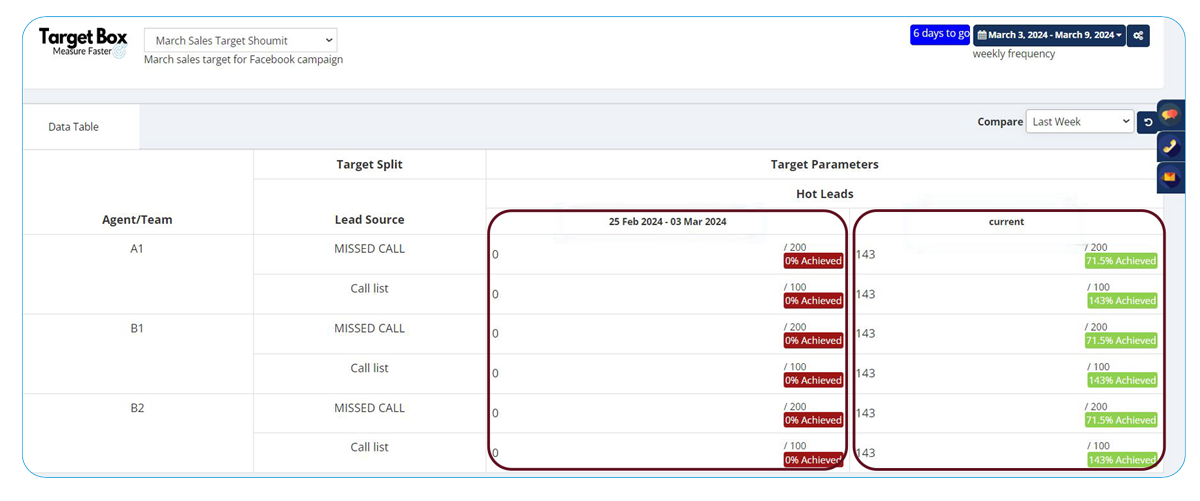
5. Compare Functionality: This function enables users to compare targets based on the specified Target Frequency. For example, if the Target Frequency is set to weekly, users can only compare targets on a weekly basis.
6. The Reset button for Compare allows users to reset the comparison range of the Data Table. By clicking on this button, users can reset the comparison range to its default state. For example, if a user has selected a comparison range such as "this week," clicking on the reset button will revert the comparison range to its original setting.
7. Target Period: The Target Period feature displays the frequency of a target. For example, if you have set a target period to weekly, it will be shown here accordingly.
In the comparison Data Table, Corefactors has the feature to compare weekly Target parameters as shown in the below screenshot. The picture shows the previous week’s Target and the Current week’s target comparison.
What Else Can You Know from the Target Dashboard?
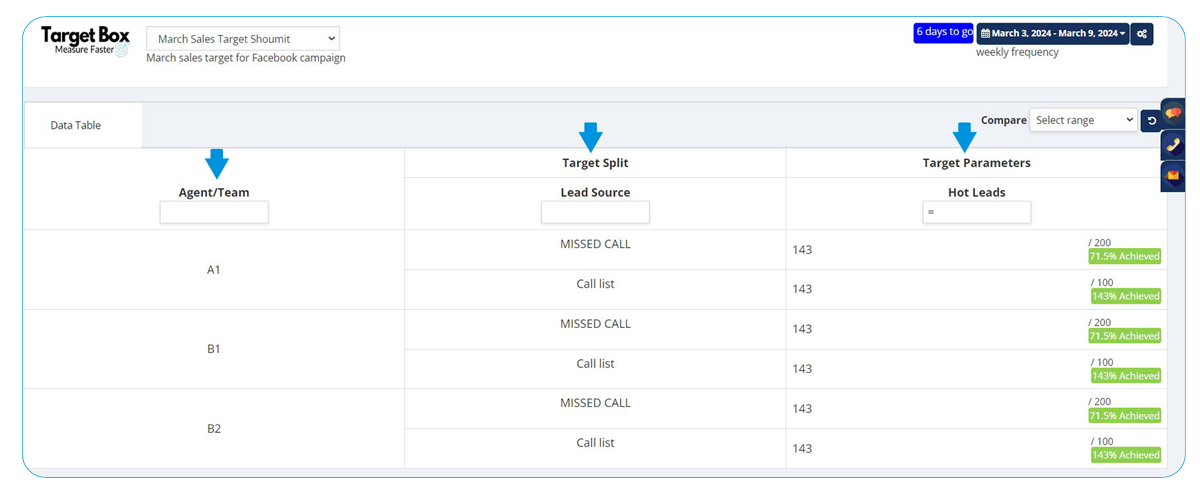
This is the Data Table of a Target that shows the Agent/Team, Target Split, and Target Parameters that users configure while Configuring the Target for their team. You can also filter the Data by Agent/Team, Target Split, and Target Parameters.
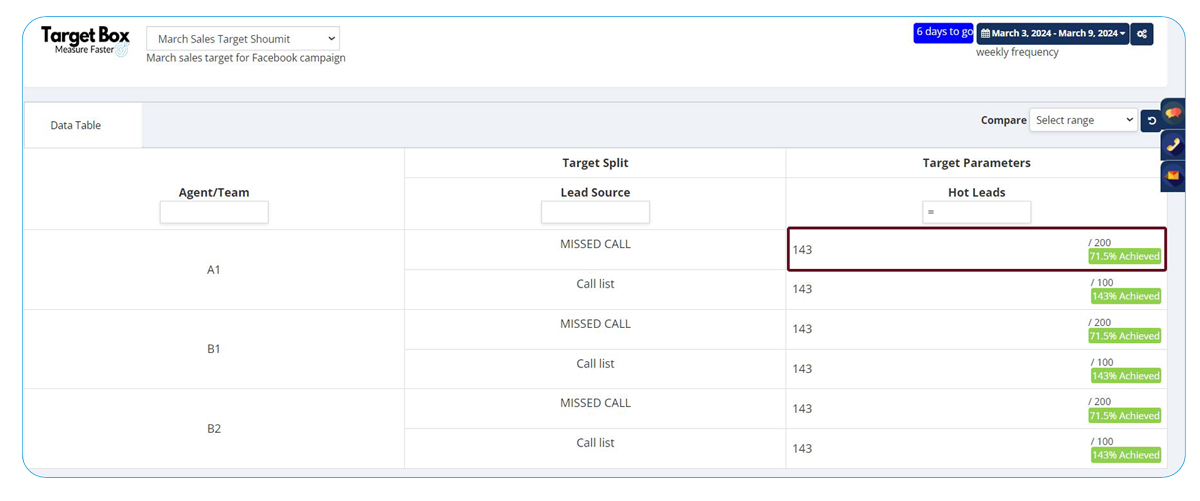
The Target Parameters section displays the total assigned target, which is currently set at 200 leads, and the achieved target, currently at 143 leads. This represents an achievement percentage of 71.5%.